How to Change a Tire: Step-by-Step Guide to Do It Safely
A sudden flat tire turns a smooth drive into a stressful roadside stop. Waiting for help burns time and money, and standing near traffic raises your risk. Learning how to change a tire replaces panic with fast, confident action. Master this simple skill now and handle a flat calmly, wherever you are.
Why Knowing How to Change a Tire Builds Confidence and Safety
You cannot control where or when a puncture happens. The shoulder of a busy highway, a dark country road, or a deserted parking lot—none offer comfort. Knowing how to change a tire gives you the power to move your vehicle to safety in under 20 minutes, without depending on a tow truck. You protect yourself, your passengers, and your schedule. According to AAA, roadside assistance calls for flat tires spike during summer travel, and the average wait time can stretch beyond 45 minutes. A basic tire change skill eliminates that delay and the vulnerability of sitting inside a stranded car.
Essential Tools You Need to Change a Tire
Before you learn how to change a tire, gather the right equipment. Many drivers assume the factory kit has everything—do not trust that assumption until you inspect it. Keep these things in your trunk and inspect them every three months:
- Lug wrench: A cross-bar wrench gives you more torque than a single-bar tool.
- Jack: Scissor jacks are common; a compact hydraulic jack works faster and with less effort.
- Spare tire: Know if you carry a full-size spare or a temporary donut spare.
- Wheel chocks: Two sturdy wedges, bricks, or dedicated rubber chocks.
- Flashlight and gloves: Mechanic gloves protect your hands, and a headlamp keeps both hands free at night.
- Reflective triangles or LED flares: Make your stopped car visible from 200 feet away.
- Tire pressure gauge: Check the spare’s pressure before you mount it.
- Owner’s manual: It shows the exact jack points and lug nut torque specs.
Consumer Reports recommends adding a portable 12-volt air compressor and a breaker bar if your lug wrench is short. Preparation makes learning how to change a tire straightforward.
Prepare Your Vehicle: Park Safely and Secure the Car
Stop on a flat, hard surface as soon as you notice the flat. Driving even a quarter mile on a deflated tire destroys the sidewall and turns a simple tire change into a rim replacement. Activate your hazard lights. Apply the parking brake firmly. If you carry a manual transmission, leave it in gear. Position wheel chocks on the opposite side of the flat—behind a rear tire if the flat is at the front, in front of a front tire if the flat is at the rear. This stops any rolling. Everyone exits the vehicle through the door away from traffic and stands behind a guardrail if possible.
Step 1: Loosen the Lug Nuts Before You Jack Up the Car
Place the lug wrench securely on one lug nut. Turn counterclockwise. You only need to break the initial resistance; do not remove the nuts yet. Work in a star pattern if you can, but just cracking each nut loose is enough. The car’s weight on the ground provides the stability you need to apply force without shaking the vehicle. If a nut refuses to budge, place the wrench horizontally and stand on it gently—your body weight supplies extra torque. After every nut feels loose, proceed to the jack.
Step 2: Position the Jack Correctly and Lift the Vehicle
Locate the jack point nearest the flat tire. Your owner’s manual shows reinforced metal notches behind the front wheel well or ahead of the rear wheel well. Never place the jack under a plastic body panel, suspension arm, or the floor pan. Slide the jack under the point and raise it until the saddle contacts the frame. Pump or crank smoothly. Lift the car until the flat tire sits about two inches off the ground. Avoid raising higher than necessary—excessive height increases instability. If the ground feels soft, slide your vehicle’s floor mat or a flat board under the jack base to prevent sinking.
Step 3: Remove the Flat Tire Completely
Unscrew the loosened lug nuts by hand now. Set them inside a hubcap or a clean spot where dirt stays away. Grip the flat tire at the 3 o’clock and 9 o’clock positions and pull it straight toward you. Sometimes a stubborn wheel sticks on the hub; a sharp kick to the tire’s rubber edge releases the corrosion. Once off, roll the flat tire to a secure spot behind your vehicle. Never place it in the driver’s travel path.
Step 4: Mount the Spare Tire and Hand-Tighten Lug Nuts
Align the spare’s bolt holes with the wheel studs and push it onto the hub. It should sit flush. Thread each lug nut by hand until it contacts the wheel. Hand-tighten them in a star pattern: top, bottom, left, right, then crisscross. This centers the wheel properly. Do not use the wrench to tighten fully while the tire hangs in the air—spinning studs can cross-thread. Just snug, fingertip-tight is perfect.
Step 5: Lower the Car and Tighten Lug Nuts in a Star Pattern
Lower the jack slowly until the spare tire touches the ground and carries some weight but the full car weight is not yet on it. Now use the lug wrench to tighten each nut in the same star sequence. Apply firm, steady pressure. If you have a torque wrench, set it to the manufacturer’s specification—commonly 80 to 100 foot-pounds for passenger cars, which Michelin confirms in its spare tire guidelines. Final tightening happens after the car is fully on the ground. Crank each nut once more to secure everything. Do not overtighten; you can warp the brake rotor.
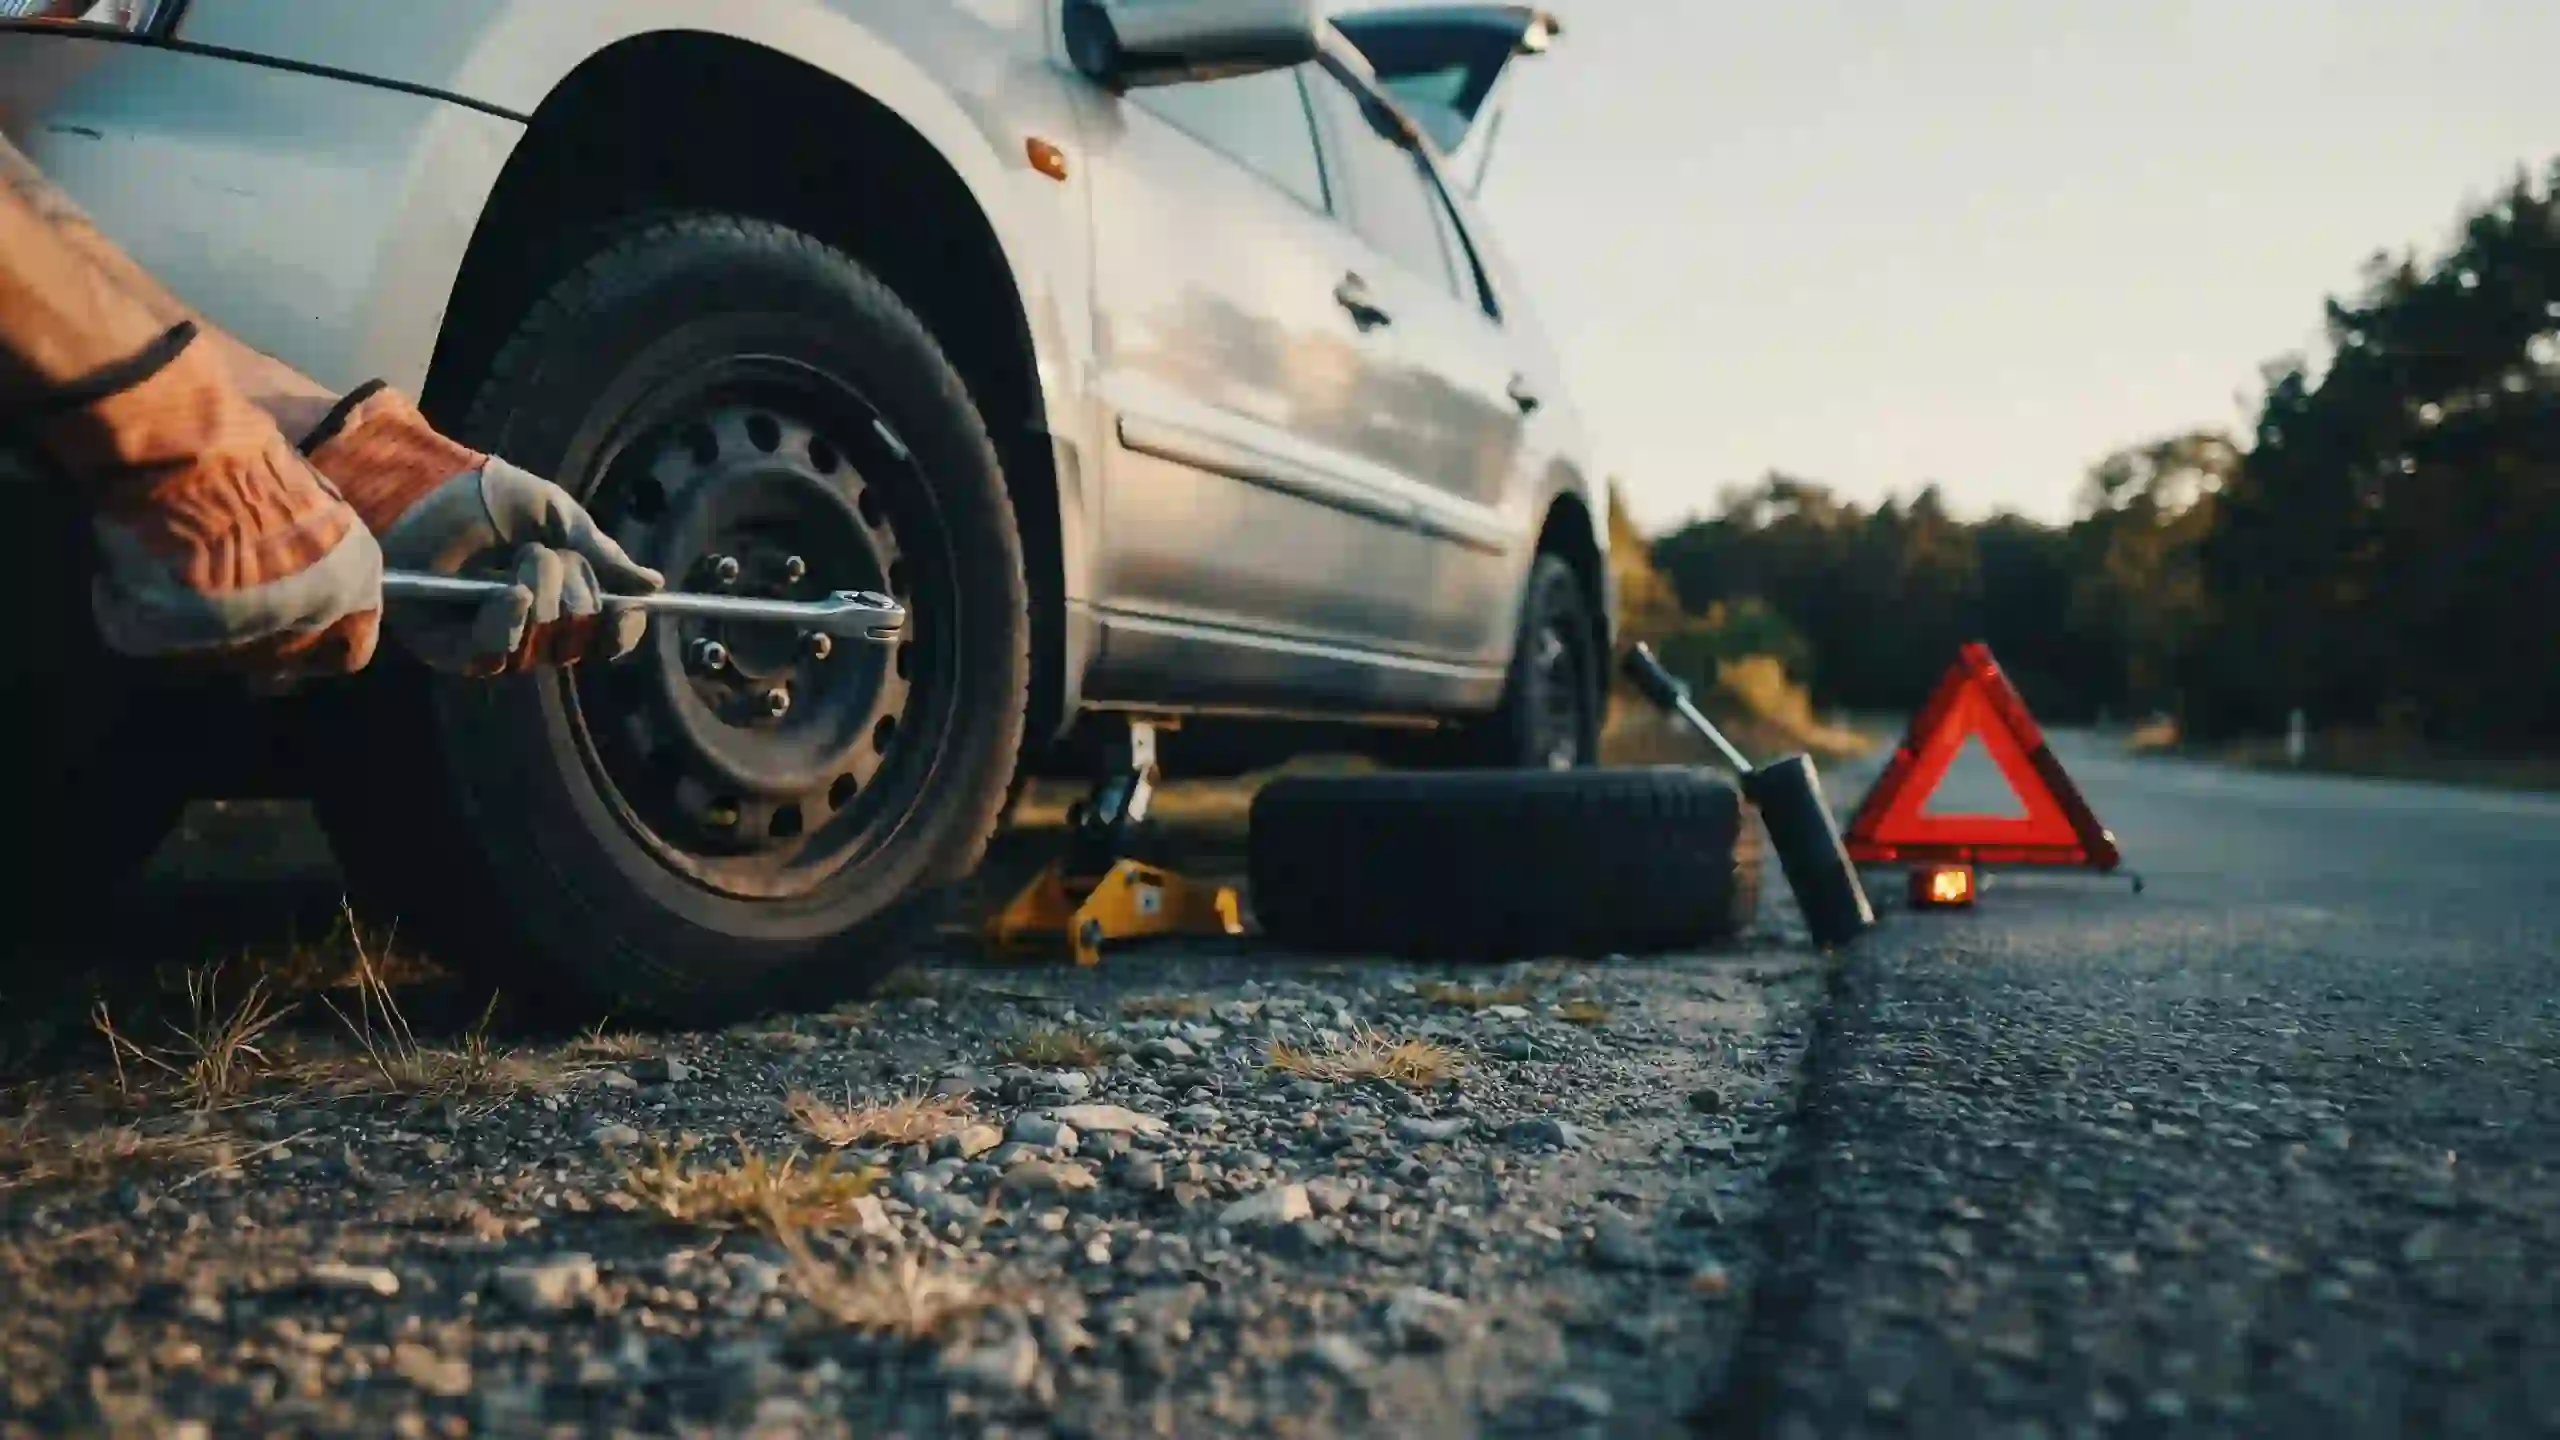
Step 6: Check Spare Tire Pressure and Stow All Equipment
Place your pressure gauge on the spare’s valve stem. Temporary donut spares require 60 psi—much higher than standard tires. Driving on an underinflated spare damages it quickly. Inflate with your compressor or find a service station promptly. Pack away the jack, lug wrench, chocks, and flat tire. Double-check that no tools lie in the road. Test your hazard lights and proceed with caution.
Spare Tire Limitations: What You Need to Know After Changing a Tire
A donut spare is a rescue device, not a replacement tire. Most manufacturers cap distance at 50 to 70 miles and speed at 50 mph. Check the sidewall for exact limits—exceeding them blows the spare and endangers control. Full-size spares match your regular tires and can travel without restrictions. After any tire change, visit a tire shop within a day. The technician checks if the flat tire is repairable or needs replacement. NHTSA tire safety research shows that driving on a damaged tire internal structure risks a sudden blowout even after a patch.
How to Change a Tire on Uneven Ground or a Hill
A flat on a slope requires extra caution. Turn your front wheels toward the curb if facing downhill, or away from the curb if facing uphill. This angles the car so it rolls into the curb instead of traffic. Use additional chocks behind the uphill side tires. Never lift a vehicle on a severe incline—if the slope feels steep, call for help. On gravel or grass, increase your jack base area with a wide plank of wood. Grass hides uneven dips that tip the jack. Once you master how to change a tire on pavement, you adapt the same sequence with these adjustments.
When to Skip the DIY and Call for Professional Help
Sometimes the smartest decision is not to do it yourself. Call roadside assistance immediately when:
- You have no safe spot away from fast traffic.
- The lug nuts are overtightened or seized by rust and a breaker bar cannot move them.
- You lack a working jack or spare.
- You have a medical condition that prevents physical exertion.
- Weather conditions cut visibility dangerously low.
AAA and similar services operate with professional gear and can change a tire in minutes even on a narrow shoulder. Protecting your life outweighs any pride in doing it alone.
Tire Maintenance Practices to Avoid Getting a Flat Tire Again
Reduce your flat risk with consistent checks. Every two weeks, measure tread depth using a penny—insert Lincoln’s head upside down. If you see the entire head, the tread is below 2/32 inch and the tire must be replaced. Inspect for cuts, bulges, and embedded nails. Rotate tires every 5,000 to 7,500 miles to even out wear. Maintain the pressure listed on your driver’s doorjamb sticker, not the tire sidewall. Bridgestone engineers note that underinflation is the leading cause of tire failure. A monthly pressure check and a visual scan before long trips save you from ever needing to learn how to change a tire under pressure, though the skill remains invaluable.
Frequently Asked Questions
How long does it take to change a tire for a beginner?
Most first-timers spend 20 to 30 minutes. With practice, you cut that to 10 minutes. Gathering tools, reading the manual once, and moving deliberately improves speed without sacrificing safety.
How to change a tire without a jack?
You cannot safely lift a vehicle without a jack. If you lost yours, flag down another motorist who might lend one, or call roadside assistance. Some drivers carry an emergency air bag lift as a backup, but a proper jack remains the only reliable method.
Can I drive on a donut spare for a week?
No. A donut spare restricts you to 50 miles and 50 mph. Driving beyond those limits destroys the spare and raises the danger of a blowout. Install a full-size replacement at the earliest opportunity.
Do I need a torque wrench to finish the tire change?
A torque wrench gives precise tightening and prevents warped brake rotors. You can complete a tire change without one, but have a shop re-torque the nuts soon after. Many auto parts stores offer free torque wrench loan programs.
What if I cannot loosen the lug nuts?
Place the lug wrench horizontally, stand on the end of the handle, and gently bounce your weight. Penetrating oil like WD-40 helps after a few minutes. If the nuts still refuse to turn, call for professional help rather than risking injury.
How to change a tire at night safely?
Park under a streetlight if possible. Set up reflective triangles 100 feet behind the vehicle. Use a headlamp to keep both hands free. Work on the side away from traffic. Treat low visibility as a serious hazard and take no shortcuts.
Mastering how to change a tire puts you in control the next time a puncture tries to ruin your trip. Bookmark this guide on your phone, share it with a new driver, and walk out to your car today to check your jack and spare. A little preparation now pays off the instant you hear that unmistakable flapping sound. Leave a comment below with your own roadside tire change story or a tip you rely on—your experience could help someone else get home safely.
About the Author: Alex Turner is an ASE-Certified Mechanic with 15 years of roadside assistance and automotive repair experience. He has personally coached over 200 drivers through emergency tire changes and regularly contributes to safe-driving workshops.